Acceso al portal
Se le brinda acceso al portal a los usuarios que necesitan poder ver documentos o información en específico en una base de datos de Odoo.
Algunos de los casos de uso más comunes en los que se necesita brindar acceso al portal incluyen permitir a los clientes ver o leer alguno de los siguientes elementos en Odoo:
leads/oportunidades
cotizaciones/órdenes de venta
órdenes de compra
facturas de cliente o de proveedor
proyectos
tareas
hojas de horas
tickets
firmas
suscripciones
Nota
Los usuarios del portal solo tienen derechos de acceso de lectura/vista y no pueden editar ningún documento en la base de datos.
Otorgar acceso al portal a sus clientes
En el tablero principal de Ododo seleccione la aplicación Contactos. Si aún no se ha creado el contacto en la base de datos, haga clic en el botón Crear, ingrese la información del contacto y luego haga clic en guardar. De lo contrario, elija un contacto existente y haga clic en el menú desplegable Acción que se encuentra en la parte superior central de la interfaz.
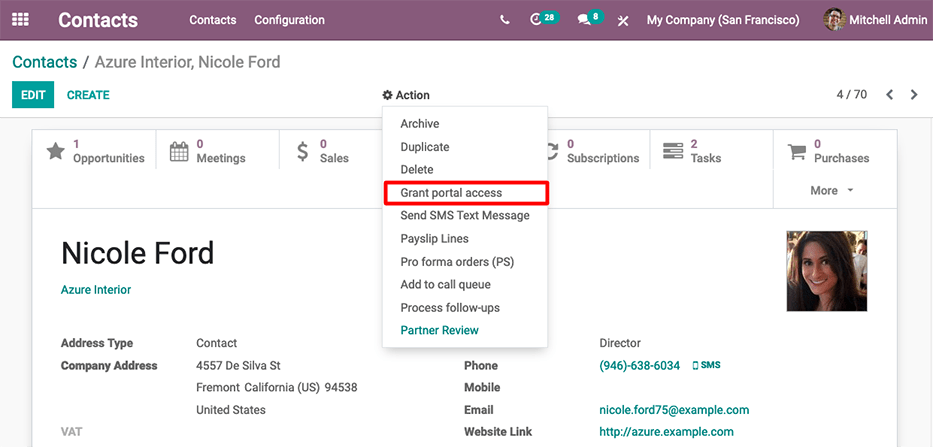
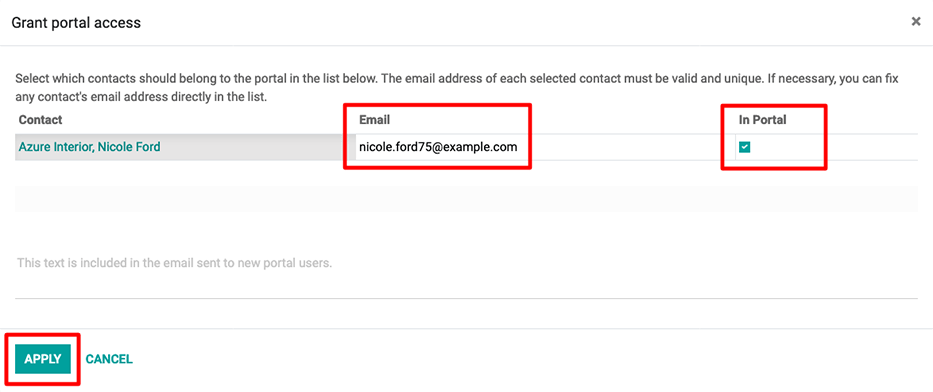
Luego seleccione la opción Otorgar acceso al portal. Aparecerá una ventana emergente con tres campos:
Contacto: el nombre del contacto registrado en la base de datos de Odoo
Correo electrónico: la dirección de correo electrónico que el contacto utilizará para iniciar sesión en el portal
En el portal: si el usuario tiene acceso al portal o no
Para otorgar acceso al portal primero debe introducir el correo electrónico que el contacto utilizará para iniciar sesión en el portal. Después, seleccione la casilla en la columna En el portal. Si lo desea, puede agregar texto al mensaje de invitación que el contacto recibirá. Haga clic en Aplicar para terminar.
Se enviará un correo electrónico a la dirección especificada, la cual indica que el contacto ahora es un usuario del portal de esa base de datos de Odoo.
Truco
Para otorgar acceso al portal a varios usuarios a la vez vaya a un contacto de empresa y haga clic en para ver una lista de todos los contactos relacionados con la empresa. Seleccione la casilla en la columna En el portal para todos los contactos que necesitan acceso al portal y luego haga clic en Aplicar.
Nota
Puede revocar el acceso al portal en cualquier momento. Para hacerlo debe ir al contacto, hacer clic en y anular la selección de la casilla en la columna en el portal y hacer clic en Aplicar.
Change portal username
There may be times when a portal user wants to change their user login. This can be done by any user in the database with administrator access rights. The following process outlines the necessary steps to change the portal user login.
First, navigate to . Then, under Filters, select
Portal Users, or select Add Custom Filter and set the following
configuration Groups > contains > portal. After making this selection,
search for (and open) the portal user that needs to be edited.
Next, click Edit (if necessary), click into the Email Address field, and proceed to make any necessary changes to this field. The Email Address field is used to log into the Odoo portal.
Nota
Changing the Email Address (or login) only changes the username on the customer’s portal login.
In order to change the contact email, this change needs to take place on the contact template in the Contacts app. Alternatively, the customer can change their email directly from the portal, but the login cannot be changed. See change customer info.
Customer portal changes
There may be times when the customer would like to make changes to their contact information, password/security, or payment information attached to the portal account. This can be performed by the customer from their portal. The following process is how a customer can change their contact information.
Change customer info
First enter the username and password (login) into the database login page to access the portal user account. A portal dashboard will appear upon successfully logging in. Portal documents from the various installed Odoo applications will appear with the number count of each.
Next, navigate to the upper-right corner of the portal, and click the Edit button, next to the Details section. Then, change the pertinent information, and click Confirm.
Change password
First enter the username and password (login) into the database login page to access the portal user account. A portal dashboard will appear upon successfully logging in.
If the customer would like to change their password for portal access, click on the Edit Security Settings link, below the Account Security section. Then, make the necessary changes, by typing in the current Password, New Password, and verify the new password. Lastly, click on Change Password to complete the password change.
Nota
If a customer would like to change the login, as documented above, contact the Odoo database point-of-contact. See above documentation on changing the portal username.
Nota
Passwords for portal users and Odoo.com users remain separate, even if the same email address is used.
Add two-factor authentication
First enter the username and password (login) into the database login page to access the portal user account. A portal dashboard will appear upon successfully logging in.
If the customer would like to turn on two-factor authentication (2FA) for portal access, click on the Edit Security Settings link, below the Account Security section.
Click on Enable two-factor authentication to turn on 2FA. Confirm the current portal password in the Password field. Then, click on Confirm Password. Next, activate 2FA in a 2FA app (Google Authenticator, Authy, etc.), by scanning the QR code or entering a Verification Code.
Finally, click Enable two-factor authentication to complete the setup.
Change payment info
First enter the username and password (login) into the database login page to access the portal user account. A portal dashboard will appear upon successfully logging in.
If the customer would like to manage payment options, navigate to the Manage payment methods in the menu on the right. Then, add the new payment information, and select Add new card.